Performing Color Calibration Using the Operation Panel
Use color calibration to correct color tones on printing paper.
 Note
Note
-
Perform color calibration in the following cases:
- After initial printer installation
- If colors seem different from before, despite having the same environmental and printing conditions
- To ensure uniform color when printing on multiple printers (However, be sure to use the same version of firmware and printer driver and the same settings.)
-
We recommend performing color calibration using the same paper as you use for printing.
-
Before performing color calibration, perform print head cleaning or print head alignment. This improves the precision of color calibration.
If the remaining ink level for an ink tank is low, replace an ink tank.
-
You can also perform color calibration using the computer.
-
Make sure that the power is turned on.
 Important
-
In order to increase the color stability precision when executing color calibration, maintain a constant temperature and humidity environment each time within the range of temperatures of 59 to 86°F (15 to 30°C) and within the range of humidities of 40 to 60%.
Executing color calibration under various temperature and humidity conditions may prevent the printers from making the correct adjustments.
- Before color calibration, ensure the printer is not exposed to direct sunlight or other strong sources of light. If the printer is exposed to strong sources of light, correct adjustment may not be possible.
-
-
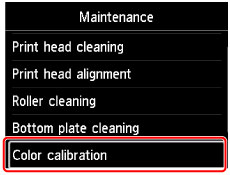
Select Maintenance on the HOME screen, then press the OK button.
The Maintenance screen will appear.
-
Select Color calibration, then press the OK button.

The Color calibration screen will appear.
-
Select Auto adjust, then press the OK button.

The confirmation screen will appear.
-
Select Yes, then press the OK button.
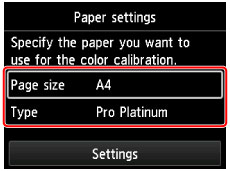
The paper settings screen will appear.
Specify Page size and Type for the paper to be used, select Settings, then press the OK button.
For details about paper, see Paper that Can Be Used in Color Calibration.

-
Load a single sheet of paper specified in step 5 in the top feed.
 Important
- You cannot use the manual feed tray when performing color calibration.
-
Gently open the paper output tray.
Open the output tray extension, then pull out the paper output support.
-
Press the OK button.
After environmental measurements and paper are checked, color calibration is executed, automatically setting adjustment values.
 Note
Note-
If color calibration was not executed correctly, an error message will appear on the LCD.
-
-
When the completion message appears, press the OK button.
 Note
Note
- To apply color calibration adjustment values to printing, set them in the printer driver or at the operation panel. However, if the values set in the printer driver and the operation panel differ, the setting of the printer driver is prioritized.
- To enable or disable the color calibration adjustment values, select Enable/disable adjustment values on the Color calibration screen.
- To clear color calibration adjustment values, select Reset adjustment values in the Color calibration screen.

